Grandpa's guide to autoresizingMask for modern UIKit developers
So I wanted to write a quick tutorial on autoresizingMask. It’s quick because there isn’t a lot of talk about. Or is it?
Before constraints based layout became a thing there was frame based layout. You were supposed to do the math yourself and just pass in the frame property of the UIView to UIKit. And that was all there to it. Later if you wanted to support both landscape and portrait mode you could use autoresizingMask to avoid repeating the math.
The autoresizingMask is just an bunch of flags that you can mix together with the bitwise | operator.
typedef NS_OPTIONS(NSUInteger, UIViewAutoresizing) {
    UIViewAutoresizingNone                 = 0,
    UIViewAutoresizingFlexibleLeftMargin   = 1 << 0,
    UIViewAutoresizingFlexibleWidth        = 1 << 1,
    UIViewAutoresizingFlexibleRightMargin  = 1 << 2,
    UIViewAutoresizingFlexibleTopMargin    = 1 << 3,
    UIViewAutoresizingFlexibleHeight       = 1 << 4,
    UIViewAutoresizingFlexibleBottomMargin = 1 << 5
};

UIViewAutoresizing mask = (UIViewAutoresizingFlexibleWidth | UIViewAutoresizingFlexibleHeight);
In Swift, this gets exported as an OptionSet, that you can then use with the fancy array syntax.
struct AutoresizingMask : OptionSet {
    static var flexibleLeftMargin: UIView.AutoresizingMask
    static var flexibleWidth: UIView.AutoresizingMask
    static var flexibleRightMargin: UIView.AutoresizingMask
    static var flexibleTopMargin: UIView.AutoresizingMask
    static var flexibleHeight: UIView.AutoresizingMask
    static var flexibleBottomMargin: UIView.AutoresizingMask
}

let mask: UIViewAutoresizing = [.flexibleWidth, .flexibleHeight]
So what can you do with this mask thing? Not a lot actually. Remember you were supposed to do all the math yourself, and this was just a quick way to make sure your same layout works even when the orientation changes, if that makes sense. So to do such a math you would initially calculate the frame of a view based on the geometry of the superview. So whenever the orientation would change it would simply mean the outmost frame (UIWindow in this case) width and height values got swapped. So every subview would then adjust their frame accordingly. But in some cases you’d prefer to recalculate the frame based on the margin from the superview - autoresizingMask was the way to avoid doing that recalculation.
Conceptually autoresizingMask works with the idea of breaking down the layout in 3 components per direction. So [left, width, right] and [top, height, bottom]. And using autoresizingMask we could specify what components don’t have a fixed value.
To illustrate, let’s say we know we want a view with some exact offset values from the edges, we could build it like:
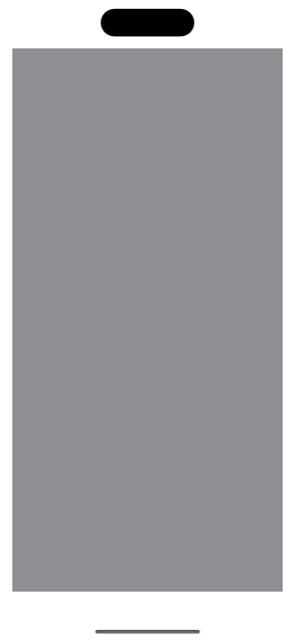
let bgFrame = view.bounds.insetBy(dx: 16, dy: 64)
let bgVw = UIView(frame: bgFrame)
bgVw.backgroundColor = .systemGray
view.addSubview(bgVw)
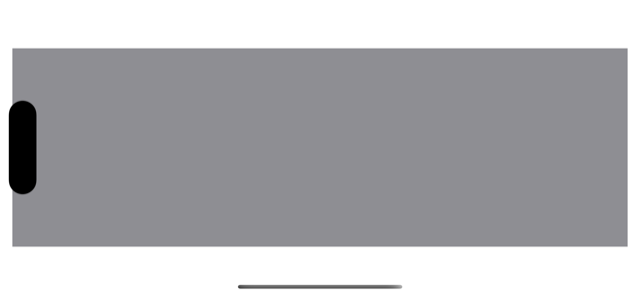
So far so good. But as soon as we rotate the device our view starts getting drawn outside of the device frame.
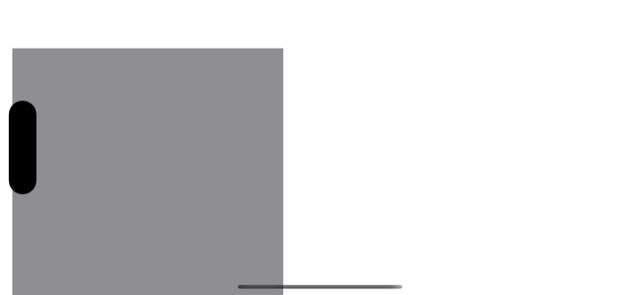
The fix for this is to set the autoresizingMask with flexible width and height to indicate that all the margins are fixed and so the width and height are flexible:
bgVw.autoresizingMask = [.flexibleWidth, .flexibleHeight]
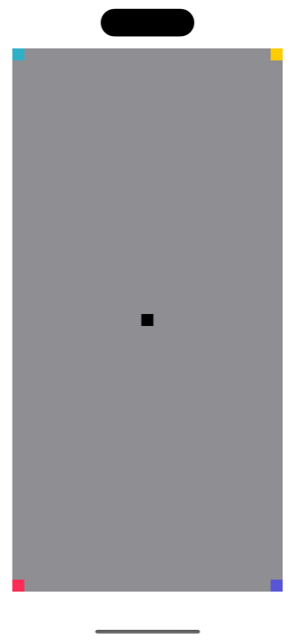
Next, if we wanted to have 4 subviews all pinned to the corners of the bgVw, first we would have to do the math and then set the frames to the respective subviews.
let bgFrame = view.bounds.insetBy(dx: 16, dy: 64)
let cornerSize = CGSize(width: 16, height: 16)
let topLeftFrame = CGRect(
  origin: CGPoint(
    x: bgFrame.minX,
    y: bgFrame.minY
  ),
  size: cornerSize
)
let topRightFrame = CGRect(
  origin: CGPoint(
    x: bgFrame.maxX - cornerSize.width,
    y: bgFrame.minY
  ),
  size: cornerSize
)
let bottomLeftFrame = CGRect(
  origin: CGPoint(
    x: bgFrame.minX,
    y: bgFrame.maxY - cornerSize.height
  ),
  size: cornerSize
)
let bottomRightFrame = CGRect(
  origin: CGPoint(
    x: bgFrame.maxX - cornerSize.width,
    y: bgFrame.maxY - cornerSize.height
  ),
  size: cornerSize
)

let topLeftVw = UIView(frame: topLeftFrame)
topLeftVw.backgroundColor = .systemTeal
view.addSubview(topLeftVw)

let topRightVw = UIView(frame: topRightFrame)
topRightVw.backgroundColor = .systemYellow
view.addSubview(topRightVw)

let bottomLeftVw = UIView(frame: bottomLeftFrame)
bottomLeftVw.backgroundColor = .systemPink
view.addSubview(bottomLeftVw)

let bottomRightVw = UIView(frame: bottomRightFrame)
bottomRightVw.backgroundColor = .systemIndigo
view.addSubview(bottomRightVw)
And ta-da!

But then as soon as we tilt our device (or in my case the simulator), the UI is all weird looking

But not to worry, the autoresizingMask will save our day. This time we know that the size is fixed but the margins are flexible. So for example the view at top-left corner needs to have the left and top margins fixed or in other words the right and bottom margins are flexible. And similarly for all other corners:
topLeftVw.autoresizingMask = [.flexibleRightMargin, .flexibleBottomMargin]
topRightVw.autoresizingMask = [.flexibleLeftMargin, .flexibleBottomMargin]
bottomLeftVw.autoresizingMask = [.flexibleRightMargin, .flexibleTopMargin]
bottomRightVw.autoresizingMask = [.flexibleLeftMargin, .flexibleTopMargin]
And boom! We are all good again!

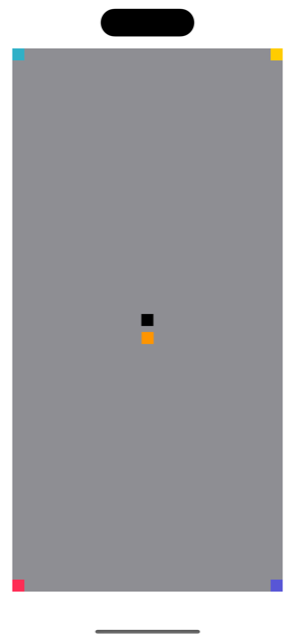
Next what if we wanted a subview that is always centered? The first part is again to just do the math
let centerFrame = CGRect(
  x: bgFrame.midX - (cornerSize.width * 0.5),
  y: bgFrame.midY - (cornerSize.height * 0.5),
  width: cornerSize.width,
  height:cornerSize.height
)
let centerVw = UIView(frame: centerFrame)
centerVw.backgroundColor = .black
view.addSubview(centerVw)
But as you could imagine as soon as we rotate the device the center view is gone

The solution this time is to have all the margins be flexible.
centerVw.autoresizingMask = [.flexibleTopMargin, .flexibleBottomMargin,
                             .flexibleLeftMargin, .flexibleRightMargin]

The good thing is that this is still using the auto layout based system. So you could add another subview using the regular constraints based layout if you wish. For example, if we wanted to add another subview but aligned to the centerVw
let centerOffsetVw = UIView()
view.addSubview(centerOffsetVw)
centerOffsetVw.backgroundColor = .systemOrange
centerOffsetVw.translatesAutoresizingMaskIntoConstraints = false
NSLayoutConstraint.activate([
    centerOffsetVw.heightAnchor.constraint(equalTo: centerVw.heightAnchor, multiplier: 1),
    centerOffsetVw.widthAnchor.constraint(equalTo: centerVw.widthAnchor, multiplier: 1),
    centerOffsetVw.leadingAnchor.constraint(equalTo: centerVw.leadingAnchor),
    centerOffsetVw.topAnchor.constraint(equalTo: centerVw.topAnchor, constant: cornerSize.height * 1.5),
])

But the bad thing is you can’t reliably add constraints to a view that is using autoresizingMask. If you try to you might get layout conflicts. You know the familiar giant wall of errors:
[LayoutConstraints] Unable to simultaneously satisfy constraints.
	Probably at least one of the constraints in the following list is one you don't want.
	Try this:
		(1) look at each constraint and try to figure out which you don't expect;
		(2) find the code that added the unwanted constraint or constraints and fix it.
	(Note: If you're seeing NSAutoresizingMaskLayoutConstraints that you don't understand, refer to the documentation for the UIView property translatesAutoresizingMaskIntoConstraints)
(
    "<NSAutoresizingMaskLayoutConstraint:0x600003e0de00 h=&-& v=&-& UIView:0x13db08780.minX == 0.500507*UIView:0x13d908cf0.width - 32.0324   (active)>",
    "<NSAutoresizingMaskLayoutConstraint:0x600003e0ddb0 h=--& v=--& UIView:0x13db08900.minX == 0   (active, names: '|':UIView:0x13d908cf0 )>",
    "<NSLayoutConstraint:0x600003e11630 UIView:0x13db08900.leading == UIView:0x13db08780.leading   (active)>",
    "<NSLayoutConstraint:0x600003e0d950 'UIView-Encapsulated-Layout-Width' UIView:0x13d908cf0.width == 393   (active)>"
)
Since now you know so much about autoresizingMask, maybe it’s time you should also be able to read this error message. Specially the secret code written after NSAutoresizingMaskLayoutConstraint. The part that might read like h=--& v=--& is nothing other than the autoresizingMask. The h and v are obviously horizontal and vertical directions and the next 3 characters are [LeftMargin][Width][RightMargin] and [TopMargin][Height][BottomMargin] with - for fixed values and & for flexible values. And since we only set the flexible values with autoresizingMask so that mean we only care about the values set to &.
So, for example h=--& v=--& means [.flexibleRightMargin, .flexibleBottomMargin].
So as a final task lets write a parser that could take input as autoresizingMask encoded as String and set the autoresizingMask just for fun.
extension UIView {
  // parse format like "h=--& v=--&"
  func setMask(format: String) {
    var autoresizingMask: AutoresizingMask = []
    let subformats = format.components(separatedBy: " ")
    for subformat in subformats {
      let comps = subformat.components(separatedBy: "=")
      if let axis = comps.first, let maskFormat = comps.last, maskFormat.count == 3 {
        let axisMask: [AutoresizingMask] = [
          .flexibleLeftMargin, .flexibleWidth, .flexibleRightMargin,
          .flexibleTopMargin, .flexibleHeight, .flexibleBottomMargin
        ]
        let offset = (axis == "v") ? 3 : 0
        for (idx, val) in maskFormat.enumerated() {
          if val == "&" {
            autoresizingMask.insert(axisMask[idx + offset])
          }
        }
      }
    }
    self.autoresizingMask = autoresizingMask
  }
}
And now we can also set the mask with bgVw.setMask(format: "h=-&- v=-&-").